| |
|
Well, that was easy. Your new strand is a simple ring: every time you
create a new document, it will have one of these rings in it, just to get
you started.
If you click in the square above the word 'Previews', you'll see what
the strand's substance looks like. To change its color, click in the box
marked 'Color' to bring up a color wheel. You can also get the color wheel
by double-clicking on the little three-lobed icon in the scrolling list
on the left. This little icon represents your strand it has the right
color, but not the right shape.
You can change the substance even more with the five sliders. 'Wetness'
makes the strand look wet; 'Iridescence' gives the color a rainbow quality.
'Roughness' lets you choose a glossy or chalky surface. 'Metallic Quality'
lets you add metallic glints, or just some variation of hue across the surface,
and 'Diameter' controls the thickness of the strand. The checkbox by the
blue halo makes a strand glow like neon. To see the effects of these changes,
click in the top preview square.
You can tilt all the strands in a knot in different directions. Try dragging
the mouse across the 'Pole's Tilt' control to get a new tilt . The pole
of this strand runs up and down through its center, like a pencil skewering
a doughnut.
Holding down the control ('ctrl') key while you tilt one strand will
make the next strand tilt the same way, making it easy to align strands.
To flip the indicator from the near side of the ball to the far side,
or back, drag the mouse from inside the ball, to outside, and then back
inside as if you were swooping the tip of the line around the edge
of the ball.
When you're finished experimenting, press that tiny round button above
the big ball it restores the orientation to straight up-and-down.
This is the way you'll want to leave this control, unless you want to make
a really confusing knot.
Here's the scoop on getting strand previews:
· Pressing Return or clicking the black square gives you a preview
of the selected strand. Or, you can see all the strands at once by clicking
the pencil button. Drag to reposition the view.
· The + and - buttons zoom the view in and out. Zoom out far enough,
and you'll see a dark gray rectangle which shows where the edge of the finished
drawing will be. If your knot is too big to fit, you can make the drawing
bigger or automatically shrink the knot using the Environment window, which
is described later on.
· The view of the strand is tilted, even though its pole is supposed
to be pointing straight up. That's because there's another orientation control
that affects the whole knot, and it's presently set at a slight angle. (It's
in the Environment window, explained later.)
And a few words about editing:
· You can make new strands up to a hundred with the
New Strand command in the Knots menu.
· If you have some text selected, then Cut, Copy, and Clear will
work on the text. If you have no text selected, then those commands work
on the selected strand. Select Keyframe will let you edit whole sets of
strands useful for animations, explained later in this manual. Confused?
Check the names of the commands in the Edit menu they'll tell you
what will happen next.
Shaping your strand
A strand is a path through space. When the knot is drawn, the sphere
whose size and colors you chose slides all along this path, sweeping out
the shape of the strand.
The shape of the path is described in terms of a variable called w; every
point along the path has a particular value of w. At the start of the path,
w equals zero. All along the path, w increases, up to pi
(3.14159) at the end of the path.
There are four rows of text boxes where you can type numbers; the bottom
three rows, with the red-and-gray icons, define functions of w which define
the shape of the path. The top row, with the blue icons, gives you variations
on that shape.
Try changing these 'variation' items in the first row first:
The one on the left, by the triangle, is 'segments.' If you have a zero
in this box, a strand will be drawn the normal way, as a curve made of several
hundred very short straight-line segments. If you type a number 2 or greater,
then the strand is drawn as that many straight-line segments, and you'll
get some sort of polygon. Your number need not be an integer. Try a three,
and click on the bottom preview. You should see a triangle. Adjust the tilt
controller if that gives you a better view.
The middle item, next to the irregular blue shape, is 'buckling'. A zero
here gives you a normal smooth strand, and anything else gives you a wrinkled,
distorted strand. (The amount of buckling is in pixels, the same as a strand's
radius.) It's best to use buckling with a small number of segments, or else
you get a mess. And if you option-click on the strand preview, that will
make the strand buckle in a different way.
The third item, next to the three little balls arranged pawnshop-fashion,
is 'pearliness.' Click this, and instead of a continuous strand, you get
a bunch of individual spheres, one per segment. Again, this is best used
with a small number of segments.
Now for the bottom three rows defining the strand's basic shape:
The first of these three rows is theta, the longitude. The next row of
numbers is the radius, the distance from the knot's center. The bottom row
is phi, which is the latitude. (Theta and phi are Greek letters used to
name angles.) |
|
|
|
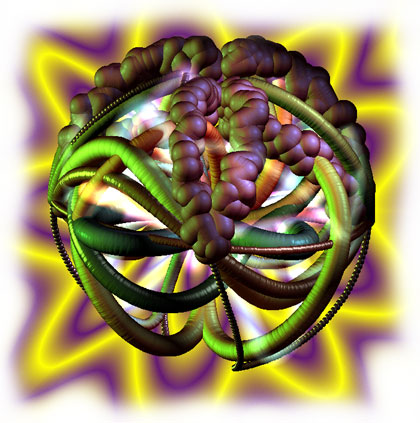
Go to the radius row, and change the second number from 0 to 100, and
the fourth number from 0 to 16. Click the bottom preview square, and you
should see something like figure 1, a sort of starburst shape seen from
an angle.
To the basic radius of 150 pixels, you've added a wiggle of 100 * sin
(16*w). Since a sine wave repeats after 2 pi, 16*w is enough to give you
eight complete wiggles. And since a sine wave ranges from -1 to +1, the
radius of this strand varies from 150-100 = 50 out to 150+100 =250. (If
you want to see a sine wave all by itself, choose Sine Wave from the Windows
menu.)
Try changing the third number in the radius row to 0.5, and click the
bottom preview square. (Figure 2.) Now you've change the phase of the wiggle
the wiggles all take place slightly ahead of where they did before,
and the result is that the whole thing appears to have spun a little. Experiment
more if you like.
OK, time to try to try something new. Get your original hoop back by
setting the last three numbers in the radius row to zero. (Or create a new
strand, using the command in the Knots menu.)
Starting with your simple hoop, try changing the phi row (the bottom
row) to 0 + 0.1 pi * sin (0 pi + 14 w), and click the preview. You should
get something like figure 3.
This is a lot like before when you added wiggles to the radius, only
instead you're adding wiggles to the latitude. Zero latitude is on the equator;
+0.5 pi is at the north pole; -0.5 pi is at the south pole. So, 0.1 pi in
the equation above is enough to make the wiggles go up and down a fifth
of the way toward the poles. The 14*w in the sine part is enough to get
you seven complete wiggles. |
|
|
|
Now change the third number so that you have 0 + 0.1 pi * sin (0.5 pi
+ 14 w). Click the preview, and you should get figure 4. Like before, with
the radius, you've changed the phase of the wiggles, and the whole strand
seems to have spun.
Now, check the checkbox over the word 'abs' in the phi row. This will
give you the absolute value of the whole sine-wave part: the positive part
stays positive, but the negative part becomes positive too. Click on the
preview; you can see that all the parts of the wiggle that used to be below
the equator have been reflected above it. (Figure 5.)
One more thing: Change the first row, theta, to 0 + 1w. Now the strand
will only go halfway around. (Figure 6.)
(By the way, the zero value of theta is a direction pointing away from
you; seen from above the equator, theta goes clockwise as it increases.) |
|
|
|
Something fancier
It's OK to type large, negative, fractional, or otherwise weird numbers
in your equation. If you type something that isn't a number at all, though,
the program will beep at you and highlight your mistake the next time you
try to make a preview or a drawing.
Try this: start over with a new strand, a plain hoop. Change the radius
to
80 +150 pi * sin (0 pi + 6 w); preview it. You'll get figure 7. Because
the size of the wiggle, 150, is larger than the constant part, 100, the
radius is sometimes negative and passes through the center of the knot.
Leave the radius like it is, and change the phi row to 0+0.2*sin(0 pi
+ 12 w). You'll get figure 8, where the strand is starting to look complicated.
Now change the phi row to 0+0.6*sin(0 pi + 12 w). Now the latitude wiggle
is more than large enough to take the strand through the north and south
poles, like in figure 9.
There are many other things to try. For example, if theta is 0 + 4 pi,
the strand will go twice around the center. If you then use an odd number
times two for the frequencies of the wiggles, with a 0.5 pi offset for the
phase of one of the wiggles, you can get a braided effect, as in figure
10.
Theta= 0 + 4w
Radius=200+25* sin(0.5pi + 22w)
Phi= 200+0.07* sin(0pi + 22w) |
|

|
|
How to make any braid you want:
Let N be the number of 'fibers' in the braid - in the example above,
it's 2.
Let U be the number of undulations in each fiber - above, it's 5.
Then fill in the strand definition like this:
Theta= 0 + Aw
Radius=? + ?* sin(0.5 pi + B w)
Phi= ? + ?* sin(0 pi + B w)
A=2*N
B=2*U*N+2, and you get to choose the rest.
Experiment! You can check out the strands in the example knot files,
and edit automagical strands, but the only real way to learn these controls
is to try numbers at random and see what happens. If you use the same number
of wiggles in both the radius and phi, you will get uniform, symmetrical
strands. If you use different but related numbers, like 4 and 8, or 3 and
12, you'll get something more interesting. Best of all are strands with
large wiggles that pass through the center like example 7, or past the poles
like example 9.
Feel free to type strange, fractional, big, small, or negative numbers
wherever you like. The only thing to beware is making a strand that, for
example, loops around thousands of times Knot will draw it, but it
will take forever. |
|
|
|
Advanced topic: Ribbons
It's possible to bond pairs of strands together. Command-clicking on
a strand bonds it to the next one, creating a ribbon whose edges are where
the two strands would have been.
These figures at right show how a pair of strands looks without, and
with, a bond.
A ribbon's color is taken entirely from its first strand; the second
one only provides some of the shape.
You can, for example, bond five consecutive strands together; this will
give you four ribbons which meet at their edges, each with a color determined
by the first strand of each pair. And ribbons look better when used with
a gobo light, explained later. |
|
 in the strand list
 in the preview
 in the final picture
 |
|
| What other controls are there? |
|
|
|
The environment window
Several other windows are available from the Knots menu; choose Environment.
This window gives you a tilt controller to change the tilt of the whole
knot, so you can look at it from a different angle. There are controls for
the directions, colors, and harshness of four lights pick a color
other than black to turn a light on.
There are two ways to control the brightness of the lights. You can get
a dim light by choosing a dim color for it - for example, gray will give
you a dim white light. The other way is the 'gobo' control: a gobo is a
shaded mask placed in front of a light source to make it throw patterned
shadows on a subject. Knot gives you a selection of gobos to put on light
#2, and using one can give your knots a moody chiaroscuro look which works
especially well with ribbons.
Make a point of toying with all the different lighting controls the right lighting can completely change the appearance of your knots.
Other controls change the color of the ambient (directionless) light,
the kind and colors of the backdrop, and the size of the finished picture.
If you check the 'Fit' checkbox, then the knot will be crushed down to fit
inside the size you've chosen.
The Resolution popup menu lets you choose low-rez drawings of 72 dots
per inch; medium-rez (144 dpi); or high-rez (288 dpi). Your computer will
need lots of memory to use the higher settings. [Users of older versions
of Knot may note and despair that what used to be called high-rez is now
called medium-rez.]
Bear in mind that on a 256-color monitor, the backdrop previews may not
be especially accurate. If you don't like any of the available backdrops,
you can choose 'Blank,' create a mask for the knot using the Draw Knot options,
and later use a paint program to substitute your own background.
The magic knot window
This window creates strands automagically instead of providing fine control.
Simply check off the kinds of strands you want, say how many, and click
'Make.'
If you want to create new keyframes for an animation, use the Keyframes
slider to say how many.
The strands you get will probably make a fairly cluttered knot; it's
up to you to winnow what you get until you like the result.
The notes window
This is a place to write some commentary about your knot.
The sine wave window
This shows a little graph of a sine wave, just as a convenience.
The drawing window
At last, you get to draw your knot. If you want the fastest drawing possible,
push the slider way up to 'Monopolize Computer.' If you are less rushed,
and want to use some other program while drawing takes place, push it way
down to 'Cooperate and Run Slower.'
The '3-D' checkbox will make the program draw a stereogram instead of
the usual flat color picture. 'Mask' will create a black-and-white mask
image, whose name will be the same as the main picture but with '.M' stuck
on the end. If you have both 3-D and Mask checked, then you get right and
left masks, called '.RM' and '.LM'.
(The masks contain silhouettes of the non-glowing strands only. To composite
a knot with glowing strands on your custom background, here's what to do:
· Render the knot on a black backdrop.
· Using your paint program, superimpose the knot picture on your
custom background using color addition.
· Then use the mask image to superimpose just the opaque strands
using color replacement.)
If you use Draw Knot with a knot with more than one keyframe, the current
keyframe is the one that gets drawn.
Now click 'Draw.' You'll be asked for a filename for the picture file,
and then Knot will draw your picture while a progress meter tells you how
it's coming along. (And if you have not registered Knot, a little reminder
appears.)
If none of this happens, check the hints in the section titled "I'm
having trouble."
The Preferences
Under the File menu is an item called Preferences, which lets you say
what program Knot's graphics files belong to. Normally, Knot will create
still picture documents that launch Photoshop when you double-click them,
and movies that launch QuickTime Player. If you want to change that, then
choose the the TIFF or Movies preferences menu item, and use the file selector
box that appears to pick out the program you want to use. You can also pick
out a document that already belongs to that program.
The Viewing item lets you say whether you want finished knots to automatically
launch a viewing program.
The Cache lets you turn on and off a buffer that speeds up the drawing
of animations. Unless your disk is completely full, you should leave the
cache on.
There are also 3-D preferences. Knot can make two kinds of 3-D pictures:
red-and-blue ("anaglyphic") images that you view with colored glasses, and full-color
stero image pairs. You can say which kind you want by using the 3-D preferences.
You can also decide whether to use the green channel in the anaglyphic pictures.
When you make stereo pairs, the image or movie for the right eye will
have ".R" on the end of its filename, and should be placed on
the left for viewing.
|
|
 without a gobo (top)
and with a gobo
without a gobo (top)
and with a gobo |
|
| How do I make animations? |
|
|
|
There are two ways:
· You can take an ordinary knot and just make it spin. To do this,
use the Animate Knot window to set the spin speed.
· Far more interestingly, you can design several different sets
of strands, called 'keyframes,' in a single Knot document. The resulting
knot animation will morph automatically through each keyframe.
To make a morphing animation, go to the main strand-editing window. (The
Windows menu will find it for you quickly.) Choose New Keyframe from the
Knots menu, and the program will insert a new keyframe right after the one
you were just on. At the bottom of the strand list should be the numbers
2/2, meaning "this is the second of two keyframes in this document."There'll also be a page-turn icon that lets you flip backwards and forwards
through all of your keyframes; or clicking on those numbers lets you go
direct to any keyframe. You can have as many keyframes as you like.
If you choose Select Keyframes from the Edit menu, then you can cut,
copy, paste, and clear whole keyframes.
To design your animation, just create new strands in each keyframe. Each
strand will morph into the strand in the same position in the list
in the following keyframe. For example, the first strand in one keyframe
will turn into the first strand in the next, so you'll want to keep all
your strands in the right order.
If you have two successive keyframes with different numbers of strands,
that's okay. During the animation, extra old strands will fade away, and
extras new strands will fade in.
If you want to have strands in the middle of the list fade in or out
like this, and you don't want to disturb the order of the list, then you
can use a placeholder. A placeholder strand doesn't draw anything, but it
holds a place in the list open. To change a strand to a placeholder and
back, option-click on it - its icon will be a black-and-white outline.
There are a couple of ways to auto-create keyframes. New Keyframe from
the Knots menu inserts an empty keyframe after the current one, and Blend
Keyframes creates a blend between the current keyframe and the next one,
and inserts it after the current one. A 10% blend means, "Use 90% of
this keyframe and 10% of the next one." (An interpolated keyframe might
have more strands than you expect, because some kinds of dissimilar strands
need two strands to blend.)
Another way is to go to the Magic Knot window and set the Keyframes slider
to some number bigger than zero, and the Strands slider to some low number.
Click Make, and you'll have a simple animation ready to render.
The Animate Knot window
This is where you get to produce a finished QuickTime movie. This window
is like the Draw Knot window with extra controls:
On the left you get to say how many frames you want in your movie, the
frame rate, and how fast you want the knot to spin on its axis during the
movie. Near the bottom is a display saying how many spins and how many seconds
of movie will result from your choices.
The movie size control lets you conserve disk space and improve the playback
speed by making a movie 1/2, 1/4, or 1/8 of the usual size.
There are three checkboxes over on the right, beneath the Go button:
'Test' makes the program draw a quick wireframe preview of the movie,
rather than slowly generating the fully shaded version.
'3-D' will give you a 3-D movie.
'Mask' will simultaneously create a black-and white mask movie, suitable
for video compositing. For 3-D movies, both left and right masks will be
created.
'Loop' lets you make a looped movie. Imagine your knot has 4 keyframes,
and you are making an un-looped movie. The first keyframe would be the beginning
of the movie, the next two would fall 1/3 and 2/3 of the way through, and
the last keyframe would be the end of the movie. You would have 3 intervals
of interpolation between keyframes.
If you turn Loop on, then the movie gets another final interval, where
the last keyframe blends back into the first. This way, the two ends of
the movie are identical and you can later view the movie in looped playback
without there being any motion jumps.
You can even animate a knot that has only one keyframe, if you want.
Just set the spin rate, and you'll get a twirling knot. And if you make
a looped movie, be sure to choose a spin rate that gives you whole-number
of spins. If there's a fraction, the motion will be jumpy.
When you're satisfied with the settings, click Go. You'll have to name
the movie, and next you'll see a QuickTime compression options dialog, offering
you a choice of tradeoffs between picture quality and the movie's file size.
If you're making a 3-D movie, you should choose high picture quality to
keep the colors pure and the 3-D effect intact.
After the movie is finished, you can play it back with any movie-playing
program, including SimpleText. |
|
|
|
| How do I make icons? |
|
|
|
The Make Icon window
This window is a lot like the Draw Knot window, but it will produce icons.
With one click you can make complete icons suites with black-and-white,
4-color, 256-color, and millions-of-color icons for Mac OS 8.5 and later.
The edge controls only affect the older style of icons for Mac OS 8.1
and earlier; they let you tune your icon so that it looks best against the
desktop pattern you plan to use it with. Icons with half-soft grey edges
will look okay against most patterns; completely soft white edges look best
when icons are used on white background inside folder windows. Completely
hard edges look bad always.
If you use Knot's icons with Mac OS 8.5 or later, they will appear with
a a better kind of soft edge whichi is not influenced by the edge controls.
Your settings for backdrop and picture size are ignored, and there is
no 3-D option for icons.
Click Make, and the program will create a file whose custom icon is a
tiny little knot. If it doesn't appear immediately, go to the Finder and
do a Get Info on the file. |
|
|
|
| How do I make seamless tiles? |
|
|
|
The Tile window
This window is like the Draw Knot window, but you get to choose the size
of the tile, and the softness of the blended edge of the background.
There is a control that allows you to set the size of the tile. This
can be any size, but if you intend to make a pattern for your Desktop, try
to make the tile square, with each side being 16, 32, 64 ,128, or 256 pixels.
The tile size is the size of the resulting graphic. The 'pictures's size'
in the Environment window is a larger space into which the knot is drawn,
and then folded over into the tile size.
To get good results, then, the 'pictures's size' should be about twice
the tile size, and the knot should fit entirely within the 'pictures's size'.
The other controls work as in the Draw Knot window.
Click Make, and the program will create a graphic which will tile seamlessly.
Use your favorite utility to convert this to a Desktop pattern, or convert
it to a GIF and use it as a web page background. A good utility available
online is GIFConverter. |
|
|
|
| How do I make QuickTime VR objects? |
|
|
|
The Make VR Object window
This window is something like the Animate Knot window minus the motion
controls.
A QuickTime Virtual Reality
object is a movie whose every frame is a view of the same object from a
different angle. When you view this movie with a program like QuickTime
Player, you can spin and turn the object any way you please.
The smoothness of the motion depends on how many individual views of
the object are in the movie. The window has two sliders, which let you say
how many longitudinal views and how many latitudinal views the object contains.
The gridded ball shows where these views will be. Think of your knot at
the center of the gridded ball; every white spot is a place from which the
knot will be seen in the object-movie.
There is also a display of the total number of views that will result.
Apple recommends drawing views every 10°, which is 36 latitude and 19
longitude increments, or 684 views in total.
Since object movies can be large, try using the Apple graphics compressor
set to 256 colors, and use a dark, blank background; this will result in
a smaller movie file than otherwise.
QTVR objects are drawn much faster when Knot's cache is turned on.
Click Make, and Knot will draw your object. |
|
|
|
| I want to be a power user. |
|
|
|
To help you get the most out of Knot, this section reveals tricks for
creating complicated, unobvious effects with the program. There's also a
look inside the program that reveals how it works, and ideas on how you
can plan your drawings to make the most of the program.
How it Works
Knot draws its pictures using a 'Z-buffer algorithm'; much as the width
and height axes are named X & Y, Z is the name of the depth axis. Knot
keeps track of how far away from the front every pixel is, and only draws
new pixels when they would be closer to the front than what's already there.
For opaque strands, the program figures out the depth and color of every
point on the near surface of a single sphere. This is the same sphere that
you see in the substance preview in the main editing window. The color has
to be calculated once for each active light source, so that's why it's faster
to use just one light.
During drawing, this sphere is swept all along the path of the strand
and is drawn over and over at every point along the way. Because the individual
spheres are so close together, they merge into a single strand.
For glowing strands, a different method is used. The program draws all
the opaque strands first, and then adds a glowing circle of color at every
point along a glowing strand's path. After enough dim circles are drawn
on top of each other, the light adds up into a bright glow. The glowing
circles are drawn only where they would be in front of the opaque strands,
so they are occluded in the right places.
For ribbons, the program splits the space between two strands into a
stream of triangles, and uses a simple polygon-drawing algorithm to paint
that region. Half the triangles have an edge on the first strand, and the
rest have an edge on the other strand. Consequently, the two sets of triangles
may have totally different orientations. Drawn normally, the stream of triangles
would look badly wrinkled. To improve the appearance of smooth ribbons,
a moving average of the triangles' surface normals is used for to calculate
shading.
For each pixel, there are 24 bits of color, 16 bits of depth, and 8 bits
of binary mask and geometry flags used by the gobo lights and the ribbon-drawing
engine. The depth is multipled by a factor of 10 in the Z-direction in order
to make the sufaces smoother.
The color model lacks gamma correction, but every attempt is made to
avoid the single-hued plastic look that poisons computer graphics. Knot
uses a simplified Cook illumination model, wherein the green components
of reflected light are compressed toward the highlight, and the blue component
is compressed even more. The roughness and metallic sliders interact to
set the amount of angular compression.The result: a variation of hue across
the surface. The 'wet' property just dims the diffuse reflection and adds
a highlight of the same color as the illmination. Iridescence rotates the
hue of the color in HSL colorspace by an amount dependent on the angle between
the surface normal and the illumination vector.
For normal lights, the program just uses the simple drawing technique
described below, but for the gobo light, the 4 channels of color info travel
with a fourth channel of angle info, which describes the angle between the
surface normal and the illumination vector. After each opaque strand is
drawn, the picture is scanned to find 'gobo pixels', and the angle data
is combined with a stored illumination ramp and a function that provides
the light intensity at any given x,y,z location; a color is calculated,
it's stored, and the pixel is marked as 'completed'.
When you render an animation, you may notice that the progress box says
it's drawing more strands per frame that you think ought to be there. That's
because when the program blends two very different strands, it may need
to do it by using two strands rather than a single intermediate one. For
example, if you blend an opaque strand into a glowing one, the program will
draw a shrinking opaque strand on top of a growing glowing one.
For morphing, the program ordinarily interpolates strand parameters in
spherical coordinates, which can produce wildly flailing results at times.
To avoid this, Cartesian straight-line interpolation is available as an
option, but is slower to render (click on a strand wtih option+command).
Blending can be turned off altogether with the discontinuous interpolation
mark (click with control+option).
Spheres
If you want to draw one great big sphere, make a cage with many closely
spaced swoops, and make the diameter of the strand so large that the strands
merge together into a single uninterrupted surface. Adjust phi so that only
the top half of the cage draws, and then tip the pole down to face you.
What this does is give you a hemispherical shell facing you, and saves time
by not drawing the far side of the shell which you can't see anyway. An
example of this is the ocean in 'ugly planet'.
The continents in 'ugly planet' are also spherical cages that have been
collapsed even further into tiny caps, and made irregular by buckling. The
atmosphere is a glowing half-cage that's been broken into pearls in order
to avoid a streaked appearance.
Haloes
Simplicity itself. Just make an opaque strand, copy & paste it, and
make the new one larger, darker, and glowing. If your first strand was
buckled, it's important to decide upon the exact form of buckling (using
option-click on the preview) before you clone the strand. That's because
there is no other way to say "I want this strand to be buckled in the
same way as this other strand."
To color a halo in a sophisticated manner, layer several strands atop
each other. Thin, bright ones atop thick, dim ones, all with the iridescence
turned up high, produce a complex result. If you want to use just one strand,
use a slightly desaturated color. That way, the brightest core of the strand
will tend realistically toward white, as if the knot had been photographed
on slightly overexposed film. Be sure to use very dim colors. Example: 'layered
haloes.'
Glowing strands that don't get lost in 3-D
Glowing strands don't look so wonderful in the stereograms as you might
like because they have no features along their length for your eyes to fix
on as stereo reference points. This effect can be fixed: put an opaque black
strand inside your glowing strand to add some definition and helps fix it
in space in a 3-D picture. 'Hellflower' shows this effect.
3-D Knots and Perspective
The pictures drawn by Knot have no perspective; you might wonder, then,
how it manages to draw 3-D stereograms. The program settles for drawing
two perspectiveless views separated by 4°, and the picture that results
is enough like a real view of a real object placed far from your eyes to
fool your vision. It's fun to display a knot stereogram on your screen,
put on 3-D glasses, and look at the screen from various distances away to
see how the depth effect changes and fails depending on where you are.
Animation by phase change
Although you can make an animation by morphing one strand into another
one with an unrelated shape, often you can get a good result by morphing
from one strand to a copy of the same strand with a phase change in phi
or theta. For a repeating animation that you plan to play as a loop, the
phase change should be 2, and you should not click the 'loop' option in
the Animation window. For examples, check the documents 'alien heart' and
'skewed braid'.
Explosions
One way to make explosions is to break up the knot into bright glowing
pearls to make hot points of light. Buckle the strands to avoid too much
regularity. Double up these strands: make large red glows superimposed on
small white or bright yellow glows to create a fiery effect. In later keyframes,
make the strands larger, the colors dimmer and redder, and distribute glowing
points closely gathered around the south pole to create the impression of
sparks falling as they burn out. Spinning the poles of the spark-strands
can produce a whirling, vortical effect. An example: 'electrosplosion.'
Segmented braids
Dividing braids into straight-line segments can make unusual strands.
Open the document 'segmented braids' and take a look.
Keyframe 1, with green strands, has a plain braid with 26 loops, and
then the same braid divided into 29, 28, 27, and 26 segments, each with
a slightly different shape. In the last one, where the number of segments
equals the number of loops, the braid becomes flat.
Keyframe 2 shows a flat braid with various phase offsets in phi, causing
a conical effect.
Keyframe 3's yellow strands have stronger phase offsets that collapse
the braid into a straight line. The white strands are just like the yellow
strands, but are curved.
Keyframe 4 has strands much like frames 2 and 3, but here there are 29
segments rather than 26, so the skewing effect looks different. Straight-line
versions are at the top of the list, and equivalent curved versions below.
Unusual shapes:
There are a few effects possible only with straight-line strands. The
document 'vetruvian' is a simple geometric shape.
'Weird strands' is just that: an assortment of unusually shaped strands
to get ideas from.
To make a star, start with a circular hoop. Change theta to pi times
some even number 4 or greater, and the number of segments to an odd number
5 or greater.
To animate a star, first make the shape more complicated so that the
motion will be interesting. Next, do animation by phase change.
With ribbons, you can make polyhedra - look at 'dodecahedron.'
To make complicated curves, try choosing for the w multipliers different
numbers which have common factors (3, 9, 27) or which have no common factors
at all (7, 13, 19). Experiment with the phase offsets
Design tips
The best way to make cool knots is to start with a clear idea of what
you want it to look like. Use the Magic Knot window to make a few strands
at a time, and then keep just the best ones, modifying them until each strand
has a satisfying shape. After you've made several nice ones, choose a few
that go together well and combine them in one knot.
You can plan the shape of whole knot this way: try to avoid a 'spherical'
shape overall. Try to make a disk, or an ellipse, or a figure-8; anything
but a sphere.
Try having groups of strands that work together as single element. For
example, look at 'wet wheel' - there are three similar red strands, and
two similar blue-grey strands.
Give a strand a neon halo. Take an opaque strand, clone it, make the
clone glow and make it larger and darker. The result will be a solid strand
with a halo, like in 'energy' or 'disorganized tangle'.
Use different kinds of strands in a single knot - curved, straight, pearl-shaped,
opaque, glowing, wet, dry, plain, iridescent, metallic, ribbon-shaped. Try
the extreme color effects you can get when the iridescence, roughness, and
metallic quality are at the maximum -check 'too colorful' for an example.
Use at least two lights all the time - one white one, and a strongly
colored one off to the side. Keep the ambient light turned off.
If you want rim lighting, you may want to use two identical white lights
so that the light is bright enough. Look at 'energy' for an example.
Always use a gobo with ribbons - otherwise the ribbons look too flat
For tiles, use soft blends as well as strands oriented diagonally to
reduce the obvious 'repeating squares' effect that can ruin tiles. try also
to keep the size of details small relative to the size of the tile.
You can get a chiaroscuro effect by turning all the lights to maximum
harshness, and making them shine from the sides.
For the background, use either dark, vivid colors, or light, desaturated
colors - not bright vivid or dark desaturated. Or try using grey backgrounds.
For strands, always use iridescence, and occasionally wetness. Color
the strands so that they go together: pick two colors on opposite sides
of the color wheel, or three equally spaced around the color wheel. Or,
use several different saturation values of one hue. Make sure the background
is not the same color as any strand.
Remember, even if you do all this, not every knot you make will really
'work'. The best result happens when you have a strong design idea in your
head before you start. |
|
|
|
| I'm having trouble. |
|
|
|
· Not enough memory: Quit the program, open Knot's Get Info window
in the Finder, and give Knot more memory. If you're running on a machine
with 4 megabytes of RAM, it may help to actually decrease Knot's
allocation to about 2000K. (This gives the rest of the computer more room
to breathe.) If neither of these tactics work, try drawing smaller pictures,
or open up the Memory control panel and turn virtual memory on. You can
also try restarting with all the extensions turned off: hold down the shift
key as the computer starts up.
· It just beeps a lot and won't draw anything: You've mistyped
or left out a number somewhere. Choose Find Typos from the Edit menu, and
that will, naturally enough, find the typos. Keep finding and fixing until
there are no more left.
· Strands appear as only tiny dots in the very center of the picture:
Increase the strands' diameters; try changing the strands' radii to 150;
turn off the 'Fit' item in the Environment Window.
· Strands mysteriously refuse to appear in movies: Knot needs
more memory but is too bashful to tell you. Give the program more memory
(with the Finder's Get Info command) or turn on Virtual Memory (with the
Memory control panel). You could also make the drawing smaller.
· The two strands in a ribbon are tilted differently, making a
skewed ribbon: control-clicking on the first strand makes the next strand
align with it.
· Can't make movies: Knot relies on the QuickTime system extension
to make its movies. If you don't have it installed, you can edit Knot documents
but you cannot actually render the movies. QuickTime can be downloaded from
http://www.quicktime.apple.com; it also comes free with new Macintoshes,
and with some multimedia programs.
· "QuickTimeLib not installed": Your machine has mismatched
versions of QuickTime and the QuickTime PowerPlug. Download new, matching
versions from Apple's QuickTime
site and install them on your computer.
· QuickTime VR object movies seem to be just ordinary movies of
a spinning knot: Object movies need to be viewed with a program that understands
them. Try using QuickTime Player, available online.
· Movies play back jerkily:
Your computer is too puny to to play back all the frames at the proper
speed. There are some things you can to to fix this:
- Use the Movie's Size control in the Animation window to reduce the
size of the movie. It'll be smaller, but it will play back better.
- Reduce the frame rate.
- Be sure you're using movie compression. A good choice is Video, 80%.
You can choose this in the dialog box that appears after you click "Go".
Cinepak is good too, except that it works very slowly. If you don't use
any compression, the movie file is vastly larger and slower than otherwise.
- Ideally, play your movie back with the monitor's color depth set the
same as the movie's. Use your Monitors control panel to make this adjustment.
(Video-compressed movies have '16-bit color'.)
- If virtual memory is on, turn it off.
- Play your movies on the fastest computer you can lay hands on.
· Your movie, with the 'Loop' option chosen, does not loop smoothly:
Go to the Animation Window and check the number-of-spins display. If it's
not an integer (there's something besides zero after the decimal point),
it should be. Change the spin rate to make that happen.
· Drawing suddenly becomes slow for no particular reason: Have
you started using a gobo? Gobos take time to do.
· Custom icons fail to appear: This can happen when the icon is
visible at the moment it's created. Go to the Finder and do a Get Info on
the icon.
· No matter how much memory you give the program, it still isn't
enough to make a big, high-resolution drawing: Knot's RAM hunger can be
fierce, since the whole image is held in memory during drawing. Turn on
your virtual memory using the Memory control panel.
· Mysterious failure when trying to make a movie: the program
probably wants more memory.
· Error -108 when trying to launch a viewing program: The computer's
memory is getting full. Try quitting other programs.
· Knot can't find the viewer programs: You have to tell it where
they are. Use the Preferences submenu, under TIFFs or Movies.
· Trouble with the Preferences file: Rare, but you may be trying
to run Knot from a locked disk. Try copying the program to a different disk,
and running it from there.
· Previews don't work: It could be that there's not enough memory:
try the fixes listed for that above. Also, try copying a strand and then
pasting it.
· Drawing fails after it's finished: It may be that Knot thought
it had enough space on the disk to draw its picture when it began, but during
drawing some other program ate up the space, until there wasn't enough for
the picture. Try running Knot alone, or free up more space on your disk.
· Can't select more than one strand at a time: This version of
Knot can't do that at all. Perhaps in the next version. |
|
|
|
| I can't remember all those funny keys. |
|
|
|
Clicking in the strand list:
With no keys: selects a strand
Command: toggles bonds
Option: toggles placeholders
Control: aligns the tilt of the next strand with this strand
Option+command: toggles the triangular Cartesian Interpolation mark
Control+option: toggles the circular Discontinuous Interpolation mark
Clicking on the strand-tilt control:
With no keys: tilts a strand
Option: tilts while showing all strands in the preview
Control: tilts, and aligns the tilt of the next strand with this one
Clicking in the strand preview:
With no keys: previews selected strands
Option: change the selected strand's buckling
Dragging across preview: reposition the view
Command: restore the preview to normal centering |
|
|
|
| What's new in this version? |
|
|
|
Version 3.8
December 1999
· Added the ability to make 32-bit icons for Mac SO 8.5 or later.
· Changed the tilt controls to always display live previews.
· The knot tilt control now has a reset button.
Version 3.7.1
January 1997
· This is a maintenance upgrade that fixes some bugs, including
one which caused crashes in high-rez images with big strands.
· Fixed a bug which caused buckled strands to deform at medium
and high rez.
· Added a checkerboard gobo light.
Version 3.7
October 1996
· The program can now make repeating graphic tiles.
· Masks are available for all forms of video.
· With a linear movie, you have the option of rendering all or
just part of it.
· Command-keys for the going to the next & last keyframes.
· New strand modifiers offer better control over morphing in animations.
· The strand preview can be dragged to a new position.
· The extent to which the program monopolizes the computer during
rendering is now tied to the system clock, producing consistent results
on different machines.
· Many bugs fixed: no more "Do you want to save" when
nothing has changed; edges of icons are no longer tinged with red; high-rez
movies work correctly; ugly disturbances of color on 256-color displays
have been banished; and the program will tell you the name of a helper program
it wants to launch but cannot find.
Version 3.6.5
August 1996
· This is a maintenance upgrade that fixes some bugs, including
a freeze that can occur with the tie-dye background.
Version 3.6
June 1996
· Strands can be bonded together to make ribbons.
· QuickTime VR objects and icons.
· 288 dpi resolution.
· Auto-viewing of knots.
· An image cache speeds repetitive drawing.
· Fixed bugs with the Fit and tilt controls, the frame progress
indicator, and long animations.
Version 3.5
March 1996
· The program is now 'fat' - meaning that on Power Macintosh machines
it will run native at about 2 to 3.3 times the speed of the previous version.
· Added a wetness slider; now strands can be more than just wet
or dry, they can be moist.
· Fixed bugs. Gone are the "error while deleting cache"message, mystery crashes in animations containing glowing strands, and pearly
glowing strands that are too-dim at high resolution.
Version 3.4.1
February 1996
· Fixed a bug in 3.3 strands would sometimes appear flat
and rough, usually in animations.
· Added a new background called Twizzles.
Version 3.3
January 1996
· High resolution - you can draw knots at 144 dots per inch.
· Gobo lighting effects.
· Side-by-side stereograms.
· The ability to use the green channel in red/blue sterograms.
· Speed.
· Fixed a bug that could make Knot crash when a document was
double-clicked in the Finder.
· Fixed a bug that made wet strands look wrong in animations.
It works with all your documents from older versions of Knot too.
Version 3.2
November 1995
This release fixes a problem with the 3-D pictures, which were far too
dim in 3.1. There are also some cosmetic improvements.
Version 3.1
November 1995
This release adds speed, and presents new options for strands that look
wet and have variable iridescence. Each light can range from harsh to soft,
and the program offers faster substance previews and drawing. The backgrounds
are also smoother - check 'Endpapers'.
Version 3.0
September 1995
This release adds animation with motion tests and stereograms, multiple
colored lights, and strands that can be bigger, glowing, segmented, buckled,
and divided into spheres. You can generate masks that aid compositing knots
onto your own backgrounds. There are new, more colorful backgrounds, animated
previews, a way to automatically create entire animations, and smoother-moving
tilt controllers. Drawing speed has increased again, and you can specify
what paint programs will open your knot graphics and movies.
Version 2.1
January 1995
This release increased drawing speed about 20%, added a new backdrop,
fixed some display bugs and a memory problem, as well as a problem with
the 'blank' backdrop's color, which would sometimes be incorrect. The TIFF
file problem in version 2.0 is fixed too.
Version 2.0
January 1995
The first release with controls to let the user change the modeling and
rendering of knots. Knots are no longer hardcoded, but are editable and
can be saved as documents. This release is shareware.
Sometimes 2.0 would create unreadable TIFF files.
Version 1.0
September 1994
The first public release. This version draws a single, unchangeable knot.
Future Versions
A version for Windows is planned. |
|
|
|
How to Purchase
Knot comes as an evaluation version. If you would like to continue using
it and with to dispel the registration reminders, you can purchase a registration
code for US$20 in these ways:
- Register online at http://order.kagi.com/?LB
, using a credit card.
Payment is accepted through Kagi, a fee processing
service. If you have questions about your order, you can contact Kagi's
customer service at support@kagi.com:
- Run the Register program that comes with Knot, which you can download
through http://www.flamingpear.com/downloads.html
.
- Order by phone with a credit card at +1 (510) 601-5244 during business
hours in the Pacific time zone. Kagi charges you an extra US$5 for this.
- Or, you can send a letter to...
Kagi
1442-A Walnut Street #392-LB
Berkeley, California, 94709-1405
USA
Your will get your code rapidly in an email message titled "Thanks
for your payment," or on a postcard if you so request.
What to do with the code when you get it:
- Launch Knot.
- Under the apple menu, choose the "Register..." item.
(If there is no "Register" item, it means somebody has already
input the code on this particular computer, and so you're already finished.)
- A dialog box will appear. Type your code into the blank.
- Click OK.
.
- A thank-you message will appear. You're done. |
|
|
|
|